ESX-1 User Guide
Getting Started
Download the Talkbox Synth App: The app is optimized for the ESX-1 and is the easiest way to achieve great sounds immediately Download here
Batteries: Make sure you use the included rechargeable batteries. The ESX-1 will not function properly with standard 9v alkaline batteries. Charge batteries completely before use. A full charge can take up to 90 minutes, and will power the ESX-1 for approximately 1 hour.
Size Adjustment: Don't not pull it apart by the projectors like a set of headphones or you could damage the ESX-1. It should be carefully adjusted from the rear shoulders and then slid on your neck from the side.
Input Volume: Turning the volume up too high may destroy the projectors! Please be careful with sound source input volume. Match your instrument volume (keyboard, guitar) to the max volume of the Talkbox Synth App.
Protect the Projectors (speakers): Keep the ESX-1 away from metal objects. The strong magnets can pull in coins or keys and scratch the projector. Also, do not twist or press on the center of the projector as this can alter the performance tuning or damage the drivers.
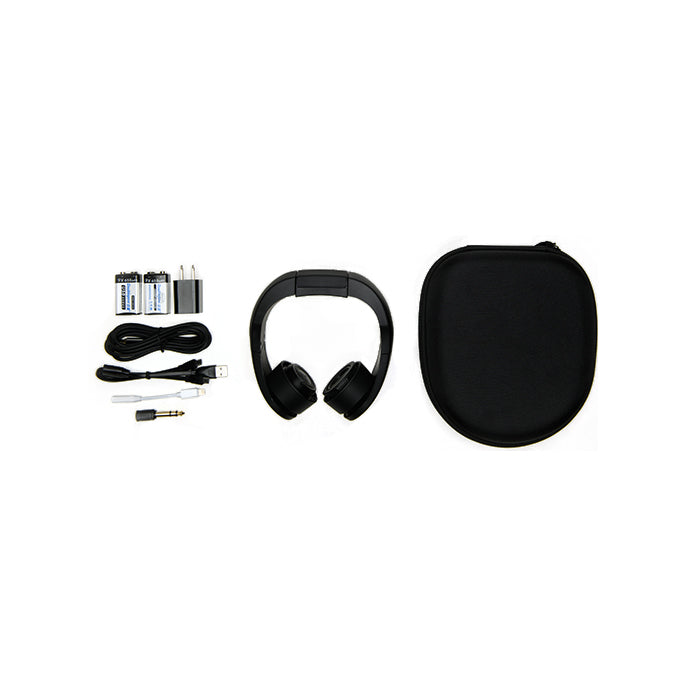
What's in the box
ESX-1 Tubeless Mobile Talkbox
One (1) 9v Lipo Rechargeable 9v Battery [Inside ESX-1]
(3) Performance Bands (stored around battery in battery compartment)
USB Battery Charging Cable for 2 batteries
Accessory Pack (Optional)
Hard Case
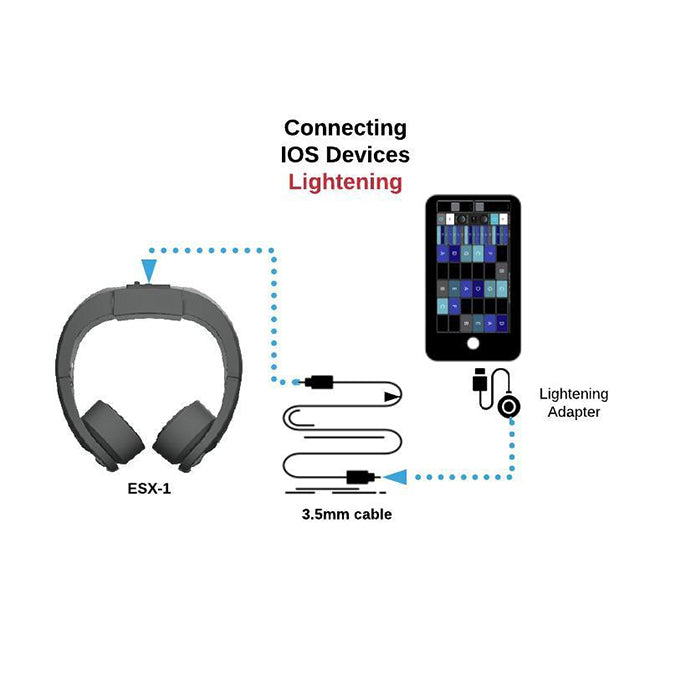
Lightning to 1/8" stereo audio adapter (iPhone 7 or above)
One (1) Additional 9v Lipo Rechargeable 9v Battery
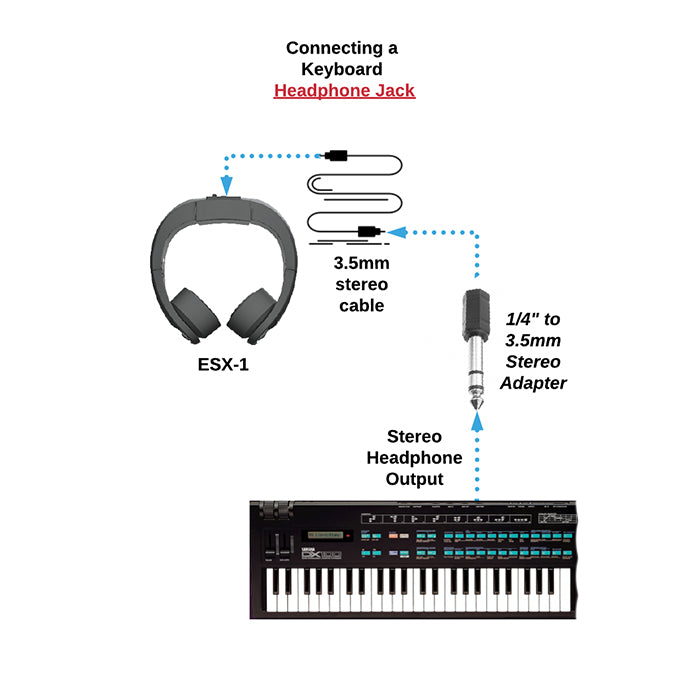
1/4" stereo to 3.5mm (1/8") stereo adapter (Keyboard)
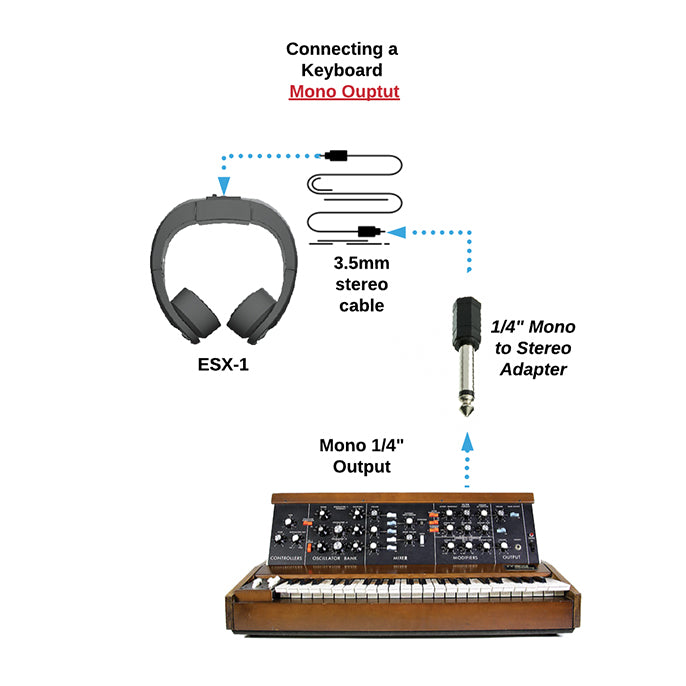
1/4" mono to 3.5mm (1/8") stereo adapter (Guitar)
3.5mm (1/8") Audio Cable (Lightning to Audio)
Adapter needed for iPhone 7 and above)
Charging & Installing Batteries
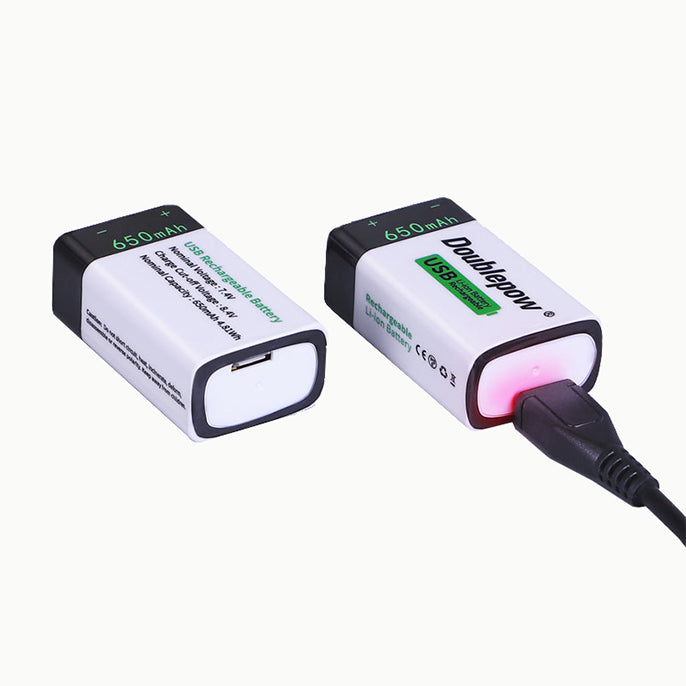
Before using the ESX-1 make sure batteries are fully charged. Always disconnect the battery from ESX-1 before charging. Caution! Regular 9v alkaline batteries will not work with the ESX-1. Only use the provided rechargeable batteries. Full charge will power the ESX-1 for 1 hour when using the Talkbox Synth App.
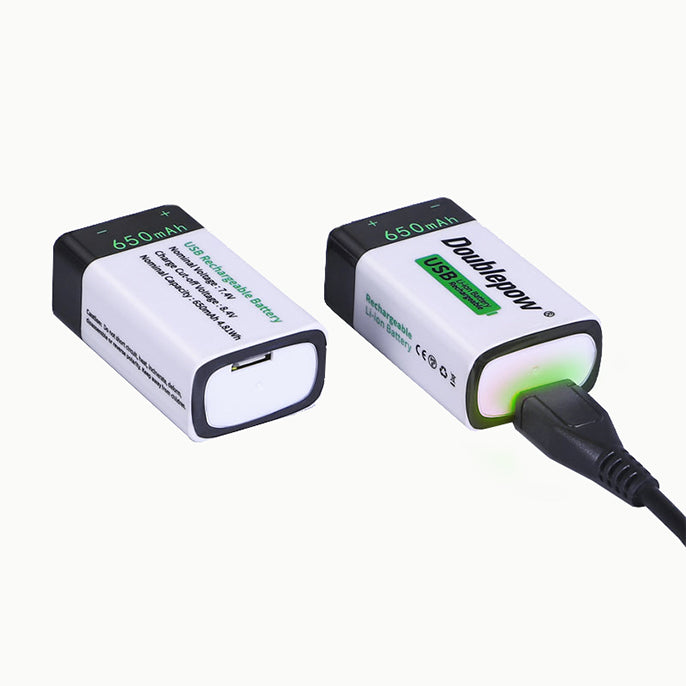
Using a 5 volt usb charger, connect the USB Y cable to the charger port (USB A). Then connect the batteries via the micro USB ports located on the bottom side of the battery housings.
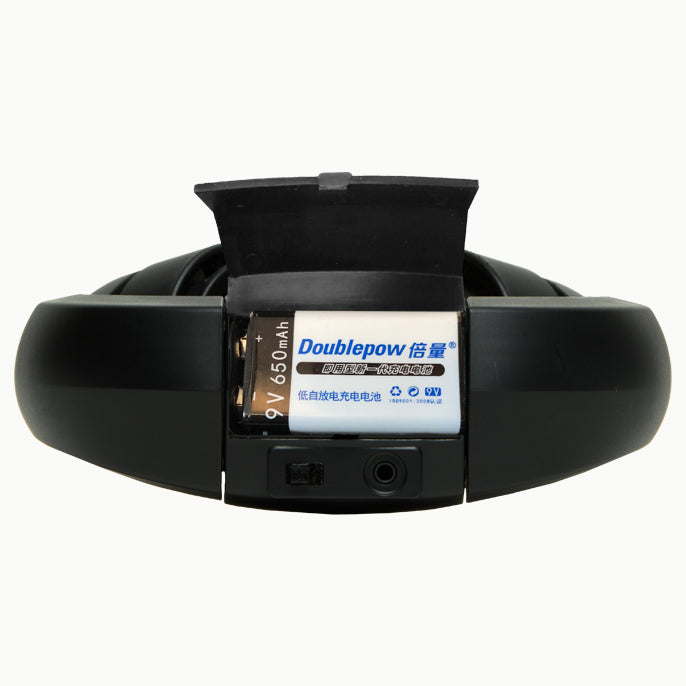
When the battery light indicator turns green, the battery is fully charged and ready for use. Charge time varies, but a full charge can take up to 90 minutes. Open the battery door using the small tab at the edge of the opening.
Open the battery door using the small tab at the edge of the opening.
With the battery door open and facing forward, holding the ESX-1 and the battery cable in one hand and connect the battery with the other. Load the battery into the compartment with the battery terminals located on the left side. The battery should lay flat and not obstruct the battery door. Gently press the battery door closed until you hear a click.
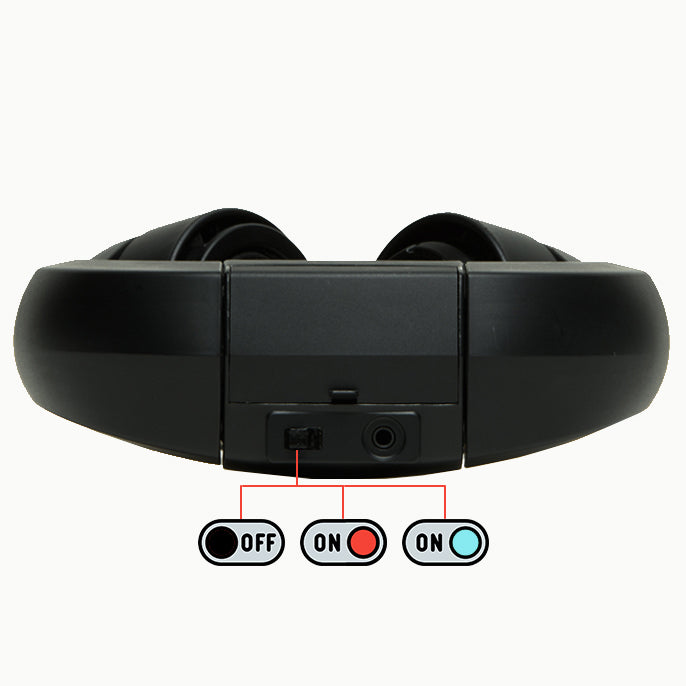
Slide the switch to the right to power on, andensure battery connectivity. The power switch has two positions. The first enables red LED’s and the second blue.
Fitting the ESX-1
Step 1. Adjust the rear shoulder
Make sure the power switch is in the off position.
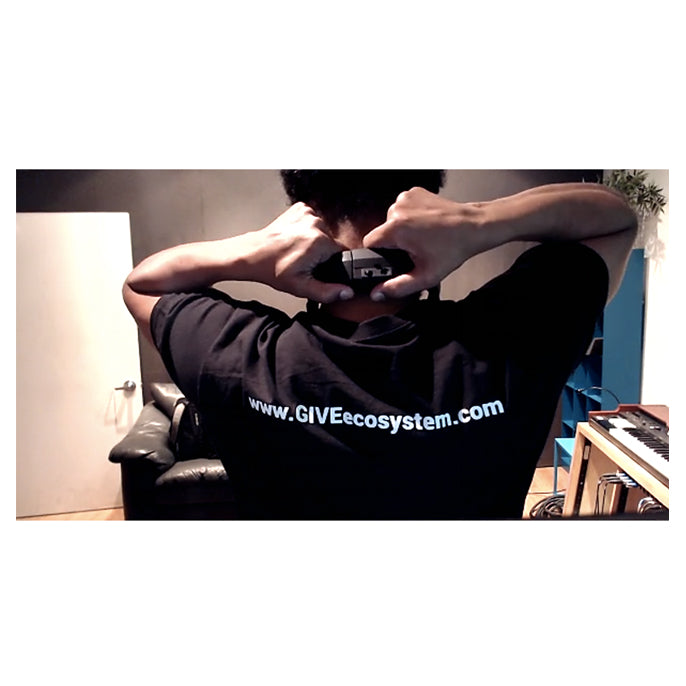
It’s important when first fitting the ESX-1 on your neck that the tworear shoulder adjustment points are completely open. Holding the center module (where the battery compartment is located), pull each section completely open.
Step 2. Adjust the arms
This adjustment ensures the proper placement of the projectors on your neck and an overall secure fit.
If your neck is more than 16” in diameter open this adjustment 50% BEFORE wearing the ESX-1. Otherwise you can leave this adjustment point closed.
Step 3: Wearing the ESX-1
Make sure the ESX-1 is right side up by checking that you can read the “E” logo on the left arm and the input jack and switch are on the bottom.
ESX-1 Logo Side
ESX-1 Power Switch
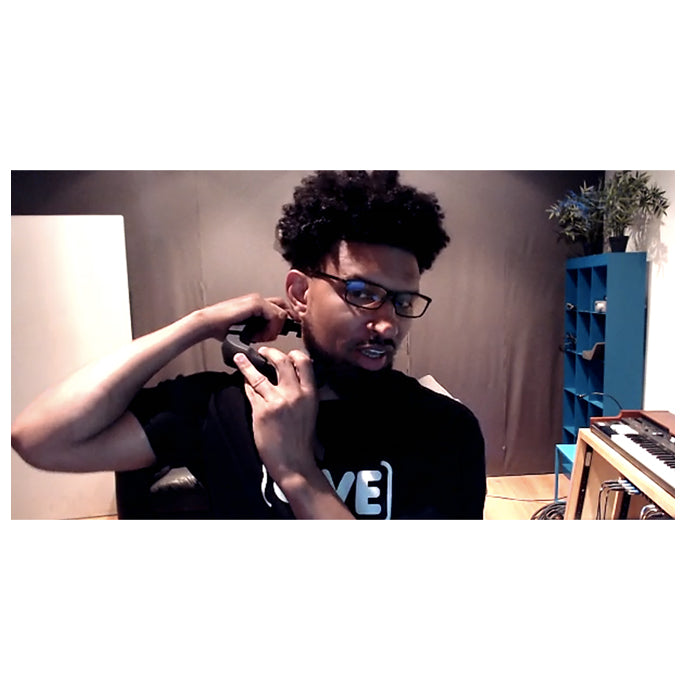
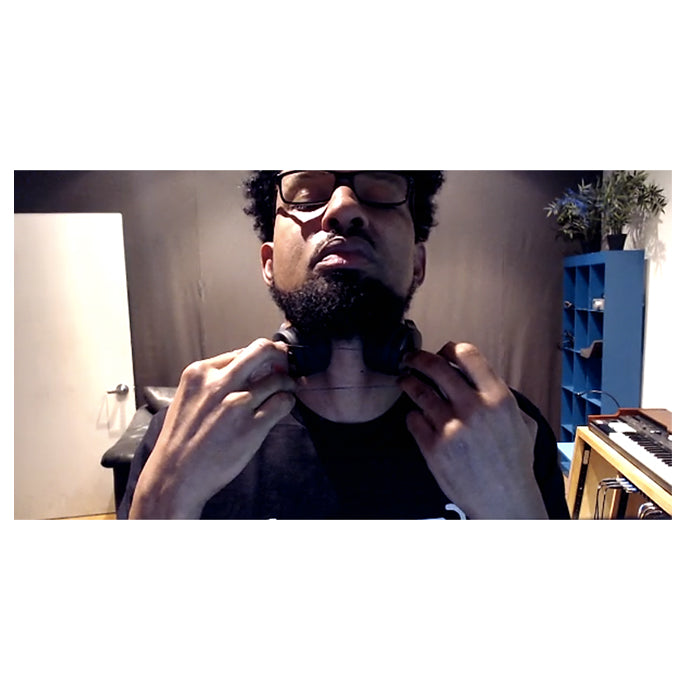
Turn the ESX-1 90 degrees and place it around your neck. Then turn it forward to playing position.
Since the neck is more narrow front to back this method ensures the least resistance and stretch.
Removing the ESX-1
Close the rear shoulder adjustment on both sides by holding the center module with one hand and pushing it closed with the other.
ESX-1 Closing Rear Shoulder
Finally, if needed adjust the side arms to create a secure fit.
Step 4. Finding the Sweet Spot
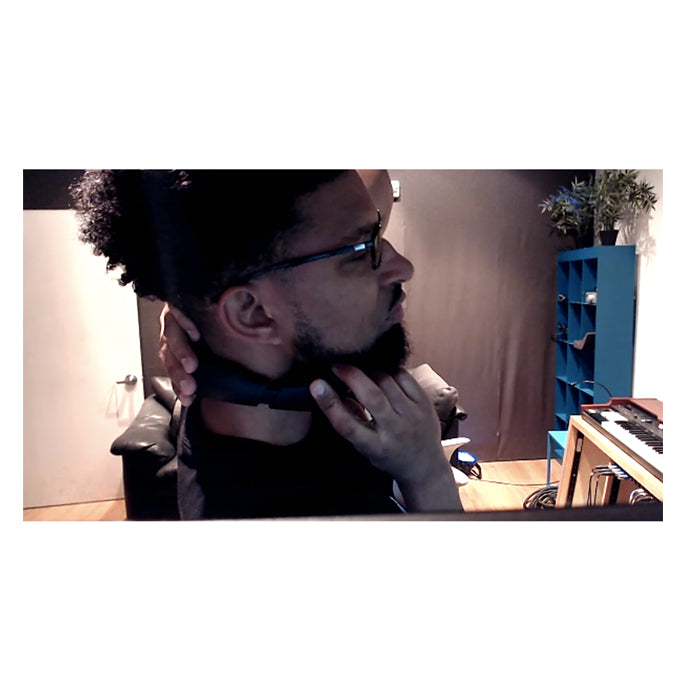
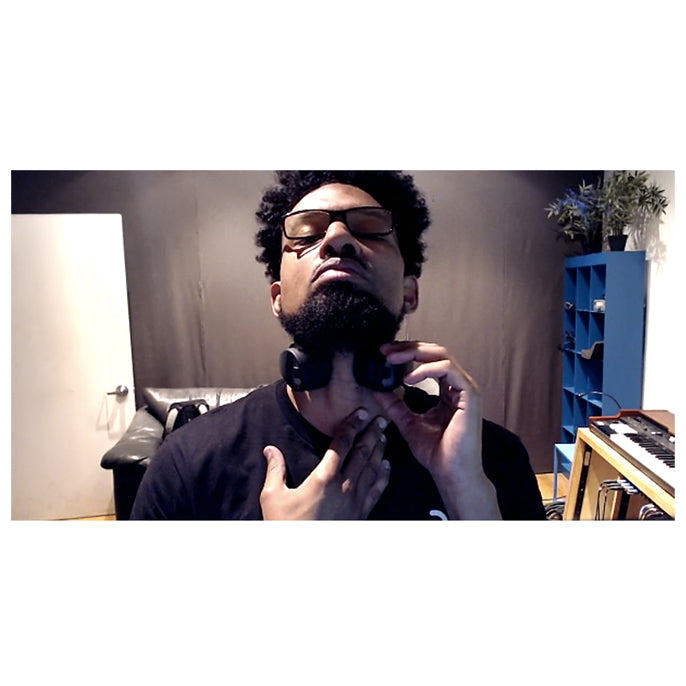
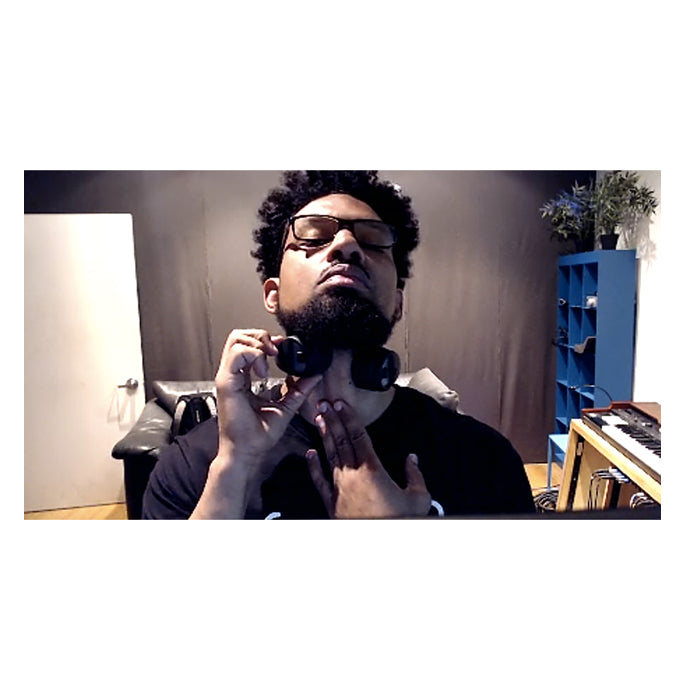
Once the side adjustments are secure make sure the ESX-1 projectors are centered which should locate them perfectly between the windpipe and the side muscles of the neck. It’s important to have the top of the projectors as close as possible to the underside of the jawbone.
To position the projectors and prevent them from slipping down, hold the skin of your neck underneath the projectors with 3 fingers and with the other hand push the projectors upwards. The projectors should feel secure and “seated” on your neck and lightly touching your jaw if possible.
Step 5. Add the performance band(s)
The performance band will secure the projectors inwards making a tight seal against your neck which is important for optimal sound! Using two bands can improve performance, but may reduce comfort.
Experiment to find where you get the best sound and feel the most comfortable. Find the sweet spot!
Step 6. Removing the ESX-1.
Power down the unit and remember to remove the performance bands
Holding the center module (where the battery compartment is located) reach around to the back of your neck and pull each section completely open.
Turn the unit 90 degrees and slide it off your neck.
Store in a safe dry place away from small metal objects that could damage the poly projector (e.g. coins, keys, tacks, paper clips etc.) If you have an official Electrospit ESX-1 case, it’s necessary to close both rear shoulder and side arm adjustments for it to properly fit.


Synth App
Download Test Flight
Check your email for invitation to Beta
Enter Redeem Code
Install and Open App
Volume
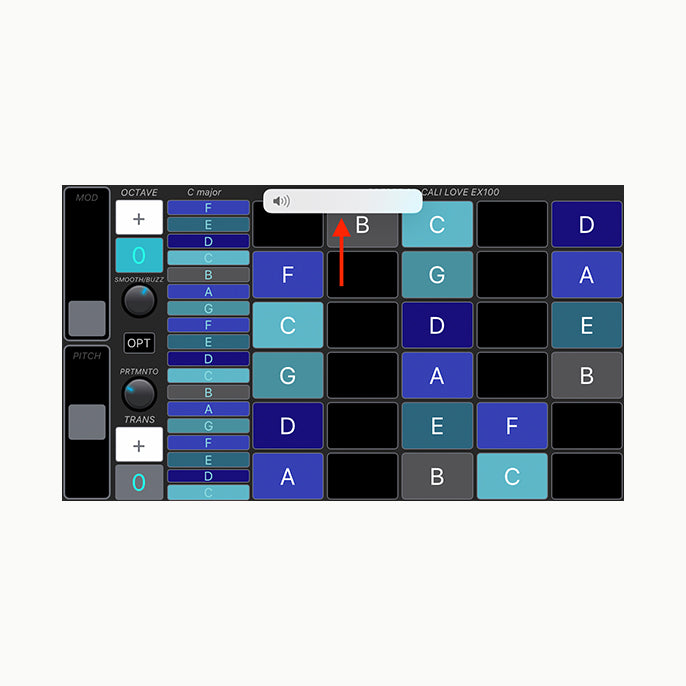
Set volume to 100% on iPhone
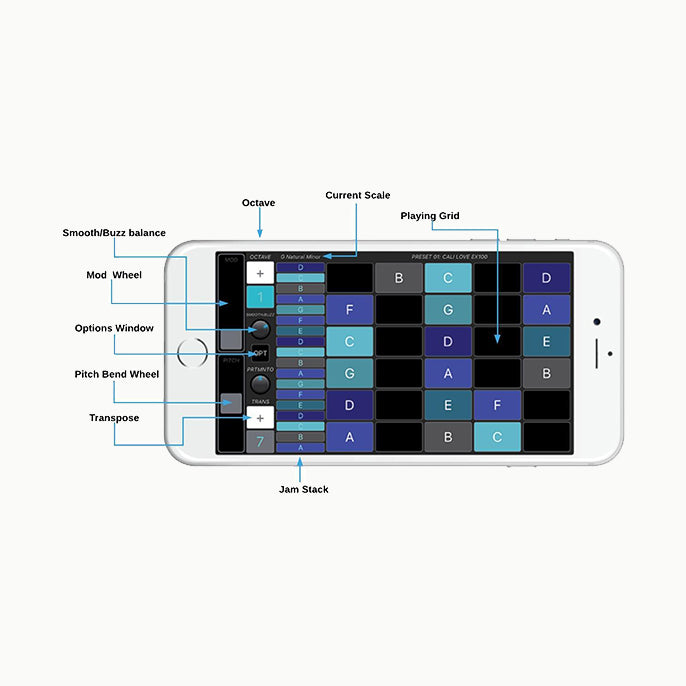
Playing Grid Layout
The keys are arranged in a 6 x 5 grid, with the pitch increasing by half steps as you move to the right and then by a fourth as you move up a level. The design allows 30 keys to be easily accessible on a small screen making it possible to play melodies that are difficult or (even impossible!) on a traditional piano keyboard.
Smooth/Buzz
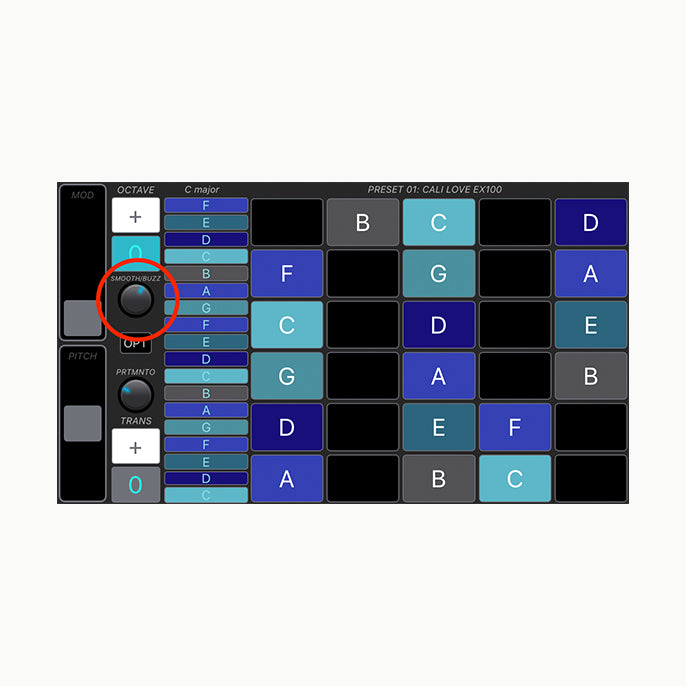
By adjusting the smooth/buzz balance knob you can create a custom blend of the left and right projector’s sound. The smooth parameter is associated with the poly projector (left Side) and will create a rich, full sound. The buzz parameter is associated with the mono projector (right Side) and will create a bright, crisp sound. Increasing the buzz parameter will make words more clear and intelligible. The smooth parameter that controls the poly projector is VERY POWERFUL and if you’re not accustomed to the high vibration in the neck it can be somewhat startling. Start at 75% buzz and 25% smooth, gradually work your way up to a 50/50 ratio and then customize from there.
Portamento and Glide Time
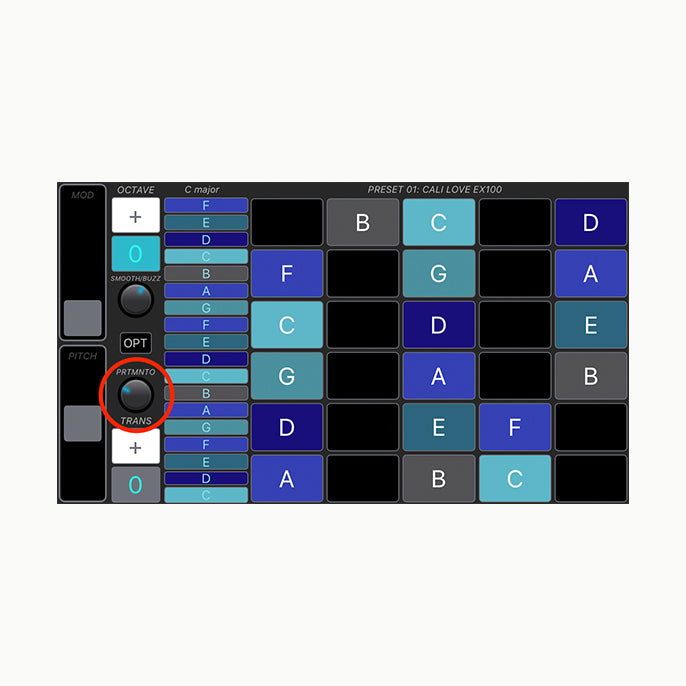
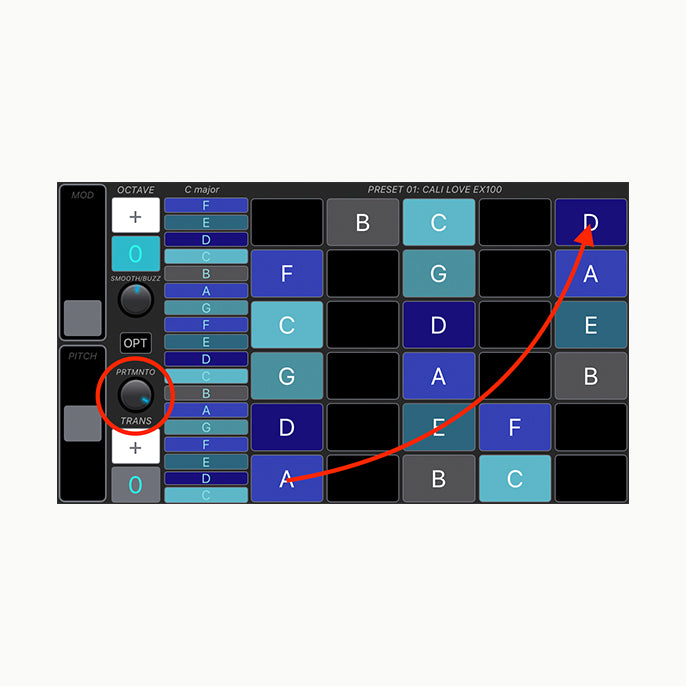
The portamento parameter causes the pitch to glide from one note to another over a period of time.
The portamento knob value represents the glide time duration. For example, adjust glide time to 100% and play from the lowest A to the high D. Notice the time it takes to arrive at the destination note is quite long. This kind of extreme portamento setting lends itself to slower playing. By default it's set to a fairly low value and which creates a little pitch bend to each note.
Octave Settings
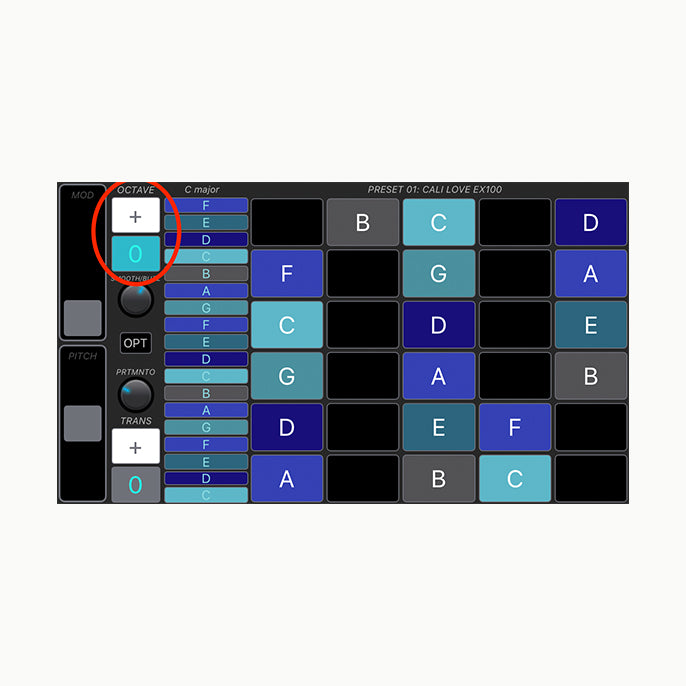
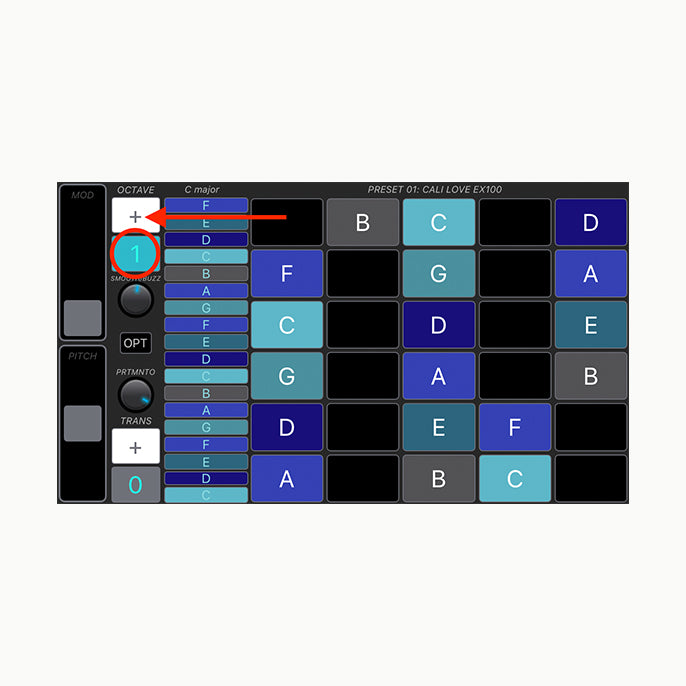
Adjust this parameter to shift the pitch range of the Talkbox Synth App.
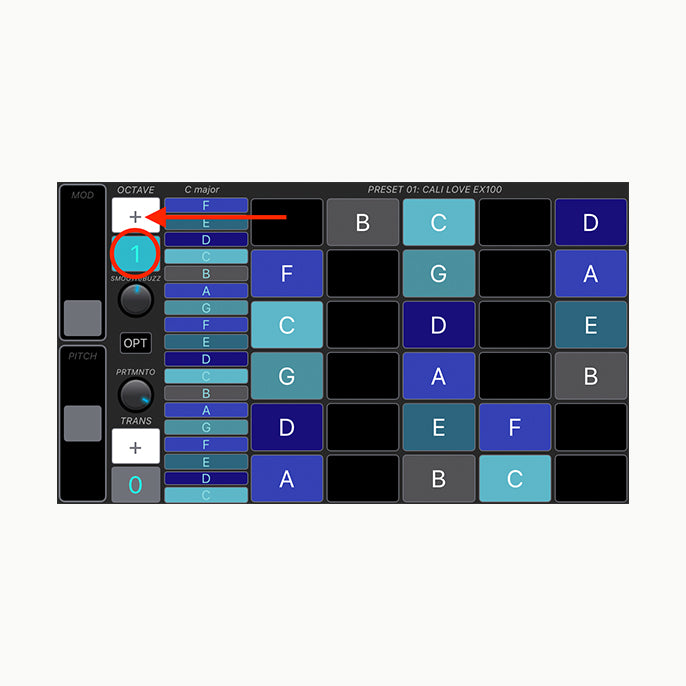
Push the + sign to shift up and an octave.
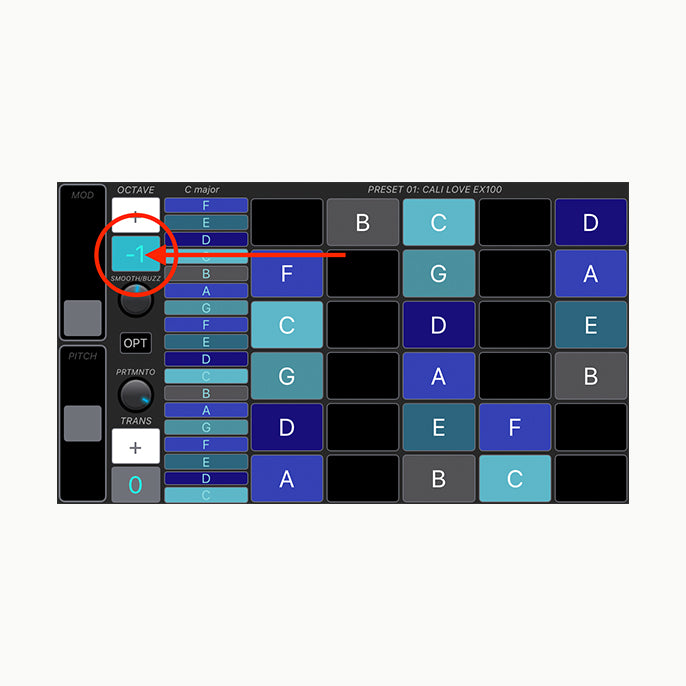
Push the blue octave number box to shift down an octave. The number
will now be displayed with a -1 to indicate a negative value
Transpose Settings
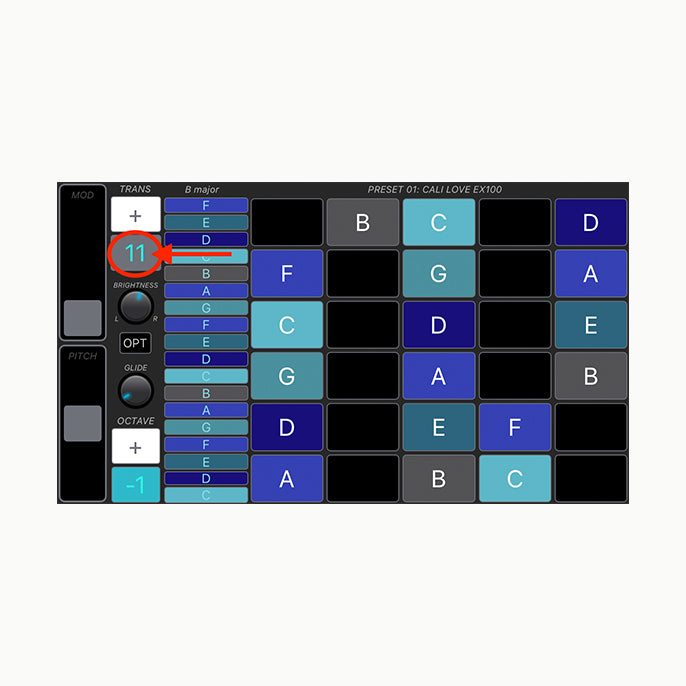
Transpose (displayed as TRANS) will shift the entire scale by half step increments up or down. For example, the default C major scale transposed by 1 will result in a C# major scale. If it’s transposed by 11 that results in a B major scale.
Try pushing the blue number box to transpose down. No negative values are displayed but instead as 11 (as in the 11 degree of the C scale. The octave shift will display as -1 as these two number boxes are internally connected. This is also an indication whether the notes are being transposed up or down. Eliminating negative transpose numbers makes it easier to remember the setting for each song with there being only one possibility instead of two. In other words, approaching the transposition values as degrees of a musical scale rather than numerical values is not only a musical approach but a logical one
Mod Wheel
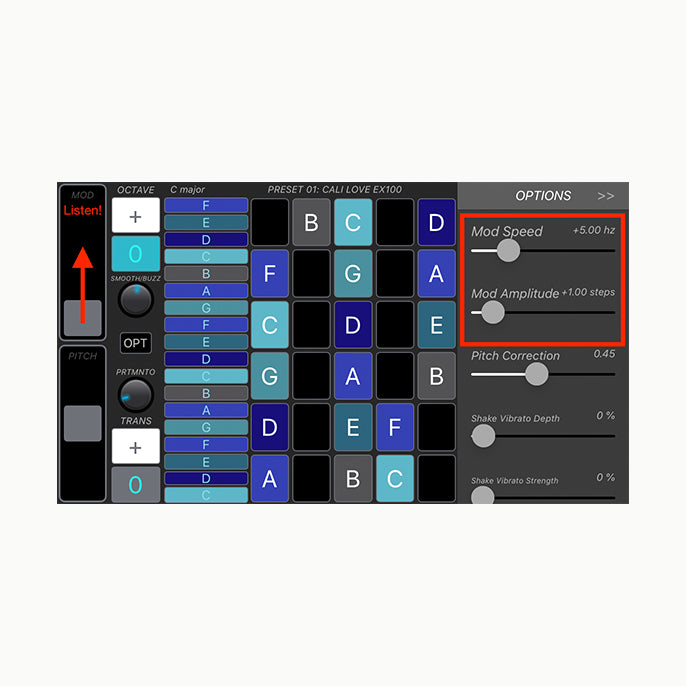
This feature functions like a modulation wheel on a traditional keyboard or synthesizer. Engaging the mod wheel, (displayed as MOD) will apply vibrato to the sound being played. Vibrato is a form of pitch modulation and the Talkbox Synth App allows for several important parameter adjustments including speed and amplitude.
The MOD slider is designed for real-time control of vibrato. Moving the fader upwards will increase the amount from subtle to extreme. There are two other parameter settings for vibrato that can be found in the Options window (displayed as OPT
iPhone App Mod Wheel
Push the OPT button 3 times to reveal the window.
(Requiring three taps is a performance driven feature to prevent accidental
opening)
Mod Speed can adjust the speed of the vibrato. Moving the slider right will increase the speed and moving left will decrease.
Mod Amplitude will increase the depth of vibrato creating a bigger range of pitch modulation with each cycle. Notice how the value of amplitude is shown in steps. Higher step values will result in more extreme pitch modulation that directly correlates to notes on the scale. Experiment with values and drag the MOD fader upwards to hear the result.
Pitch Bend Wheel
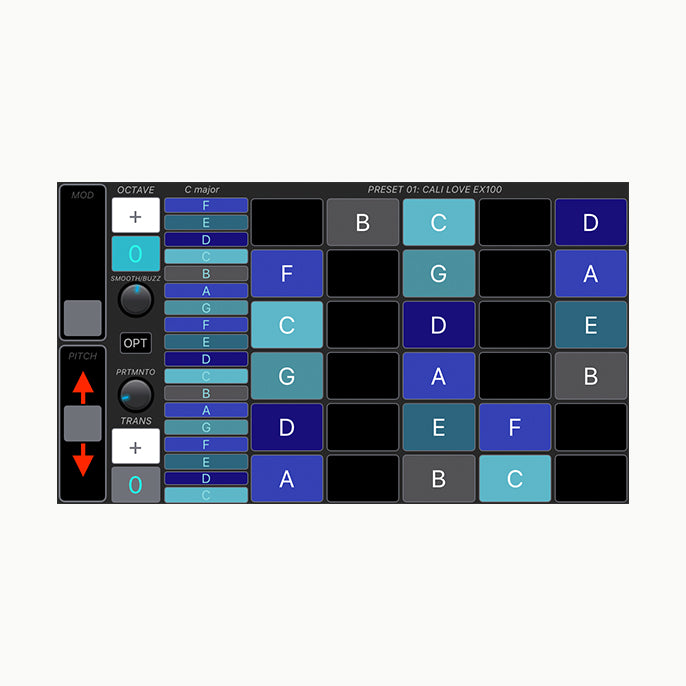
A familiar and essential control for many talkboxers is a pitch bend wheel. It’s included in the Talkbox Synth App (displayed as Pitch) and provides control of pitch bend performance of any note being played. Move the slider down while playing a note and the pitch will go down. Slide it up and the pitch goes up. It has a center detent and will always revert back to the default center position when released.
iPhone App Pitch Bend
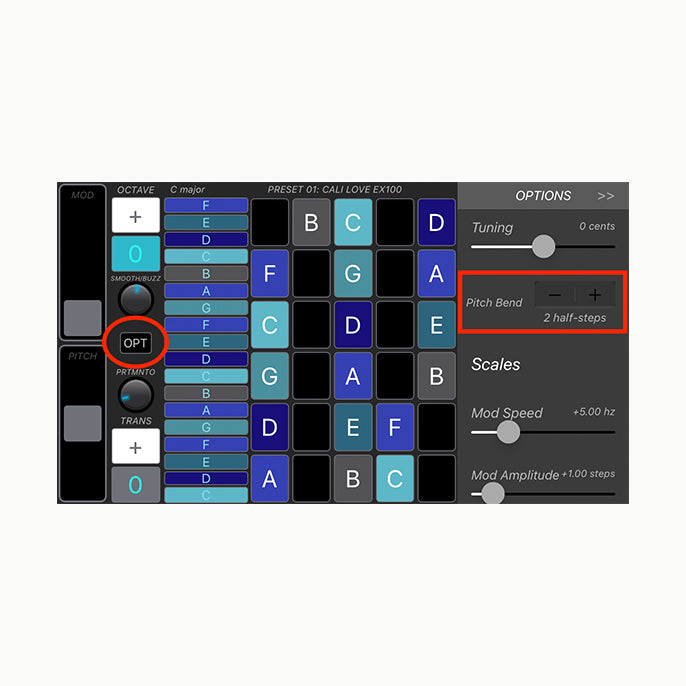
The pitch bend wheel range can also be modified in the Options window. Push the OPT button 3 times to reveal the option window . By default the range is set to 2 half-steps. Press the + to increase the range and the - to decrease.
Fingered Vibrato
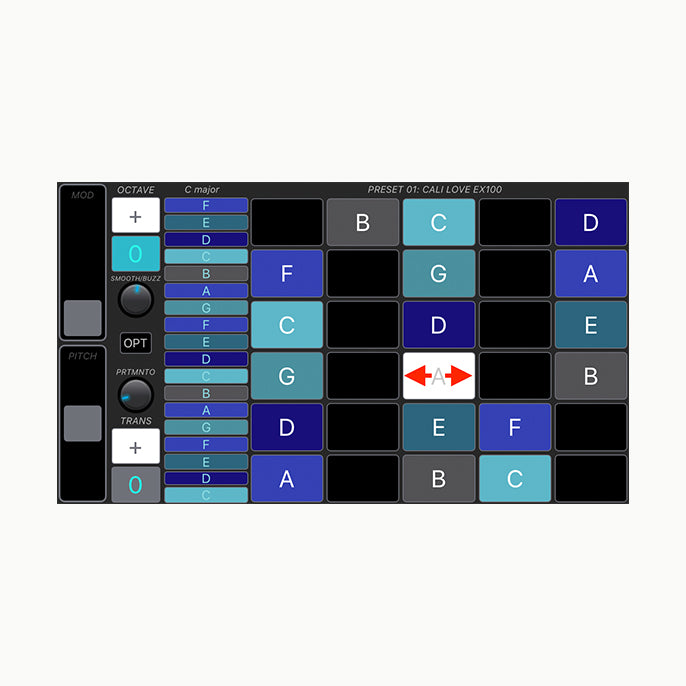
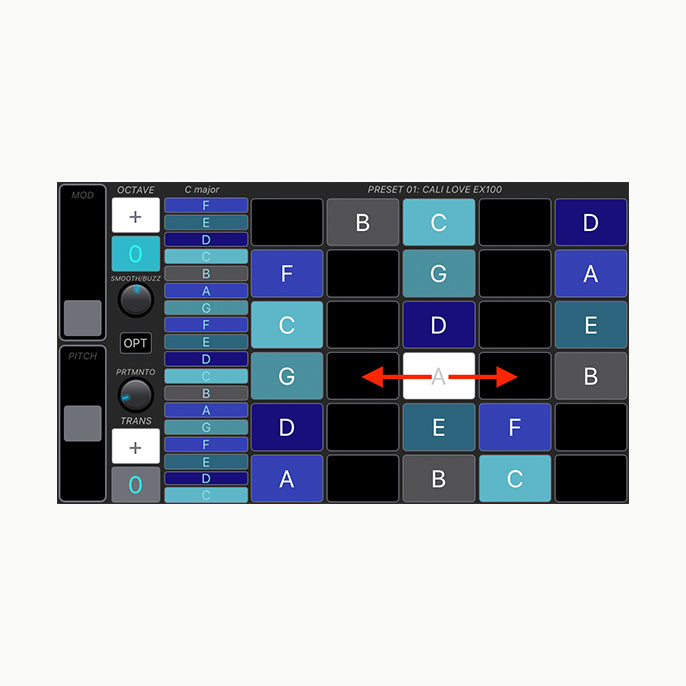
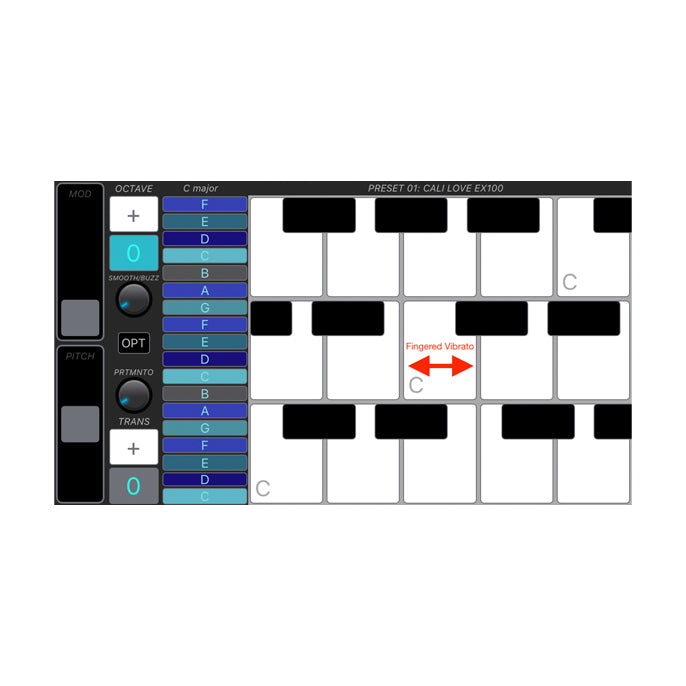
The Talkbox Synth App playing grid allows vibrato to be applied to any note being played. In Step 7, we explored the Mod wheel control and how it can apply pitch modulation to your sound. The Fingered Vibrato feature is similar, however, it allows you to control speed and depth with your finger tips! Play any note and rock your finger tip side to side. Keep within the note’s grid boundary at first. Listen to how the pitch modulates up and down creating a vibrato sound that is subtle.
iPhone App Finger Vibrato
The more you move outside of the note boundary (essentially crossing over into other notes) the more extreme the vibrato depth will increase. Similarly with speed, the faster you rock back and forth the faster the vibrato will sound.
Shaking Vibrato
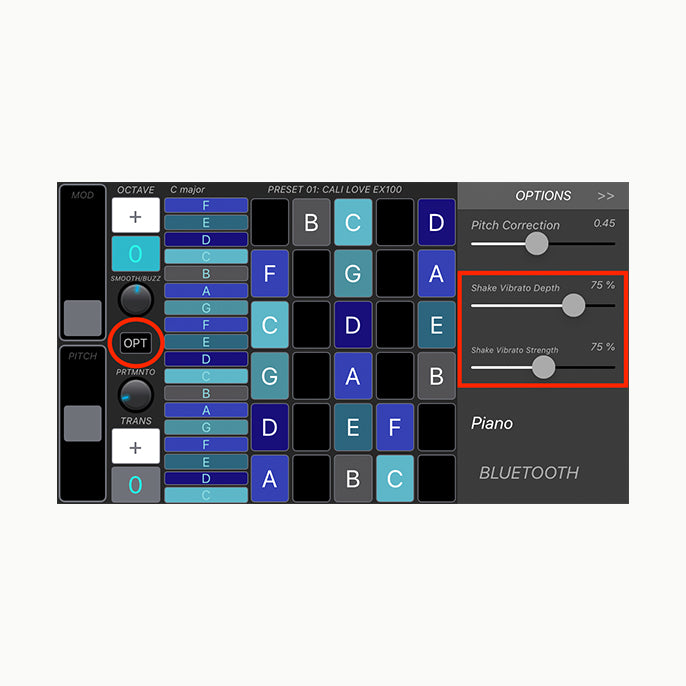
Another way to create vibrato is by shaking your device while playing a note. This can be a fun and very physical way of controlling the sound. There are two associated parameters in the Opt window that can be adjusted.
Shake Vibrato Depth is similar to amplitude in the mod wheel section. Increasing the depth percentage will make the pitch modulation greater with each shake.
Shake Vibrato Strength is a threshold setting. The higher the value, the easier it is to enable the vibrato by shaking.
As a starting point, adjust each value to 75% and proceed from there.
iPhone App Shake Vibrato
Note: Shaking only works side to side with your device. Not front to back!
Jam Stack
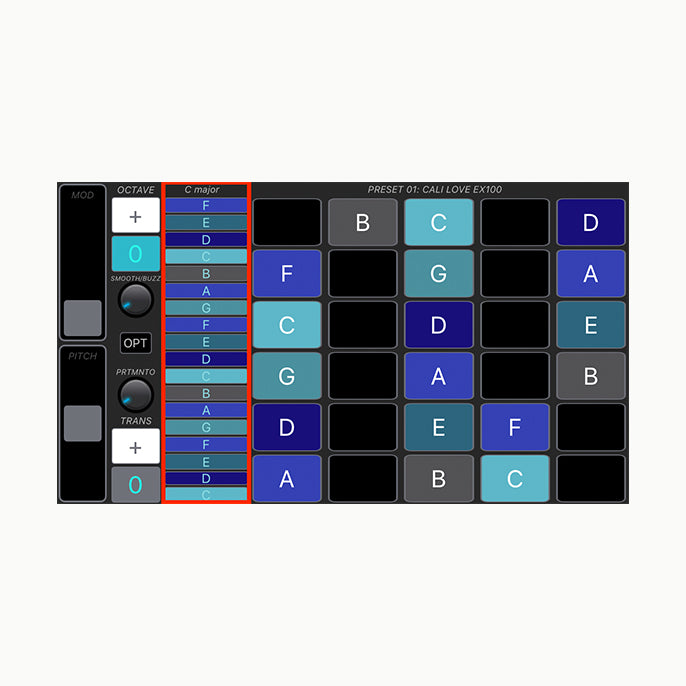
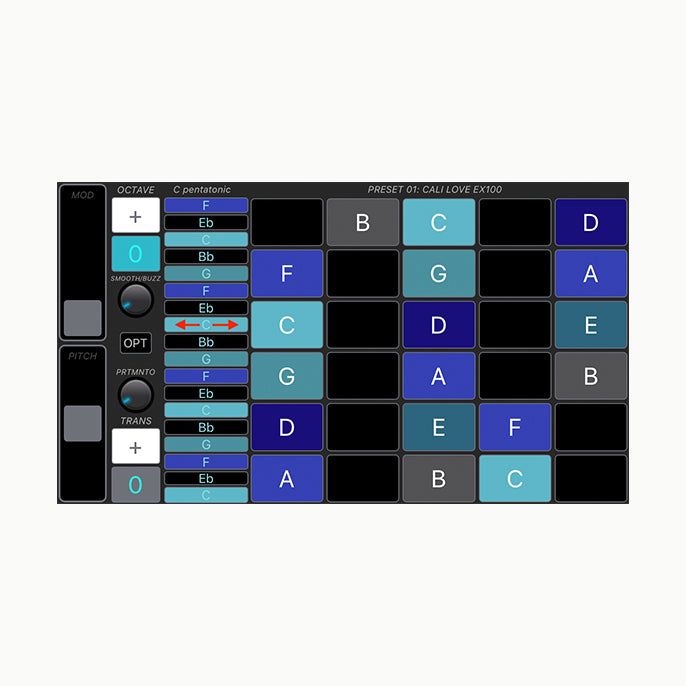
The jam stack feature is located just to the left of the playing grid. It allows you to improvise freely with predetermined scales, moving up and down vertically. This is especially effective when playing fast passages or “runs” without accidentally playing a note outside of the chosen scale. Just like in the playing grid, the pitch starts and the bottom and increases as you play upward.
Jam Stack feature
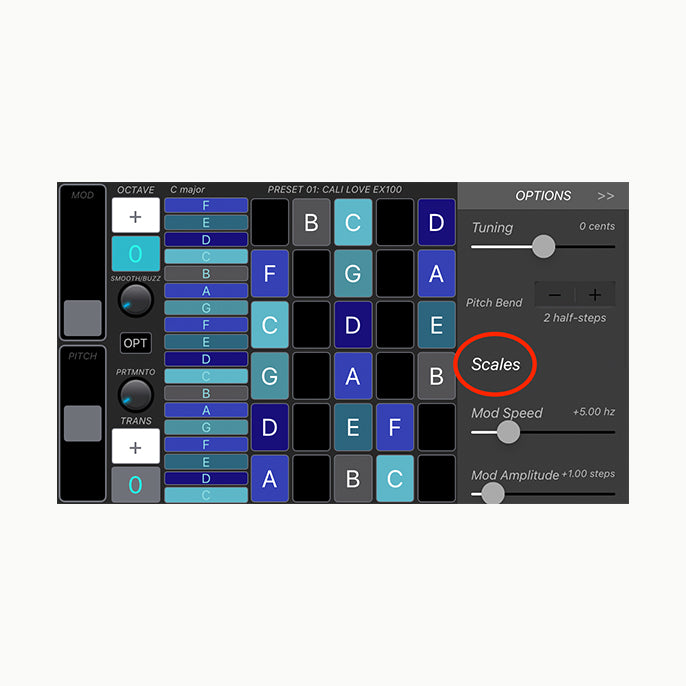
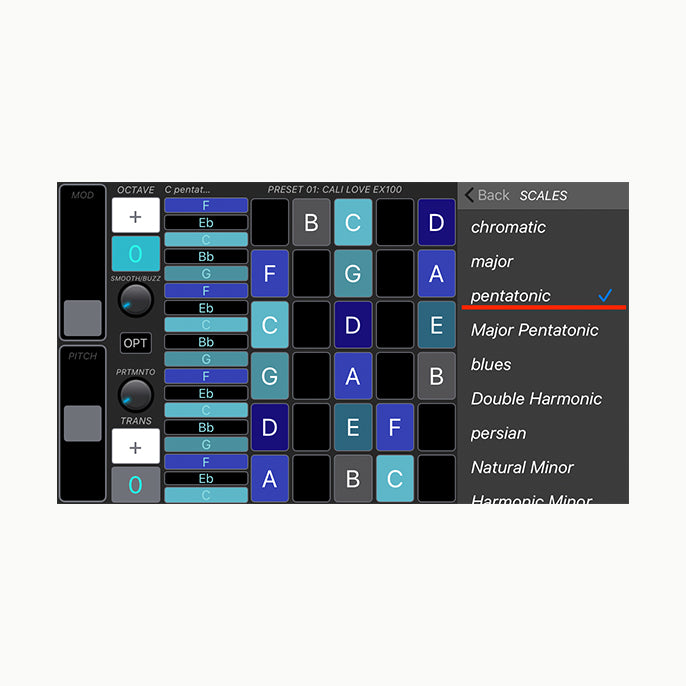
To change the jam stack scale open the options window, press the Scales icon and choose the new scale.
Jam Stack scales
Jam Stack pentatonic
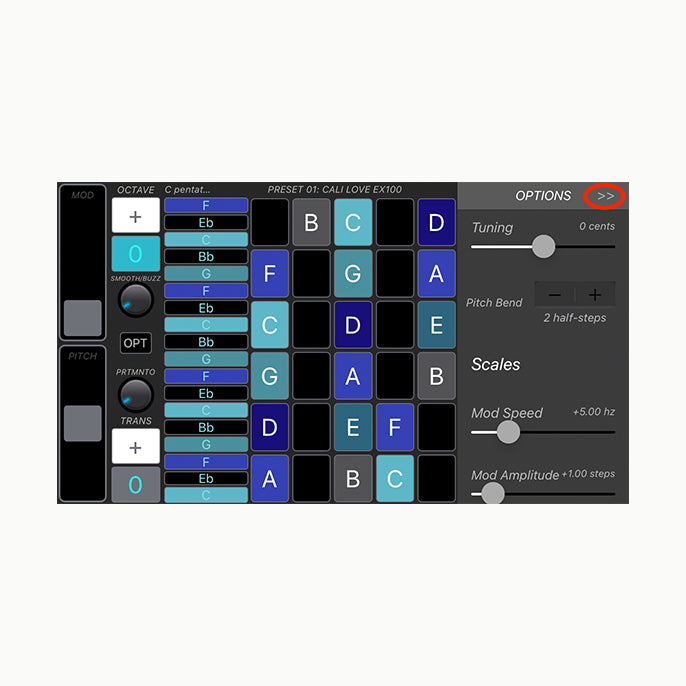
Close the window by pressing the double arrows.
Jam Stack scale display
Experiment with different playing methods. Sliding up and down as well as jumping to different areas of the jam stack. Similarly to the playing grid, fingered vibrato can also be applied in the jam stack.
Fingering for Scales
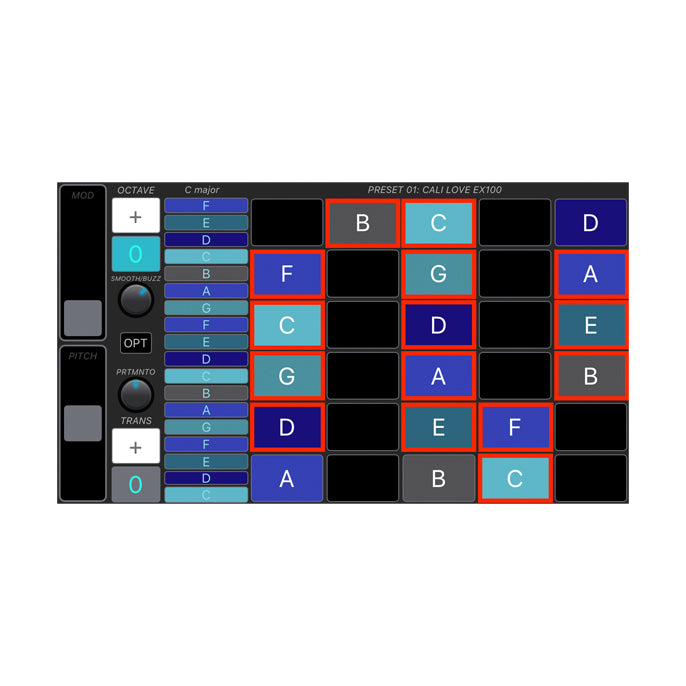
Now, let’s move from jam stack to the playing grid and play a C major scale and A minor (relative minor of C). Starting at C play the note sequence below.
C Major scale
Use only 3 fingers starting with the ring finger.
iPhone App Annotated Fingering
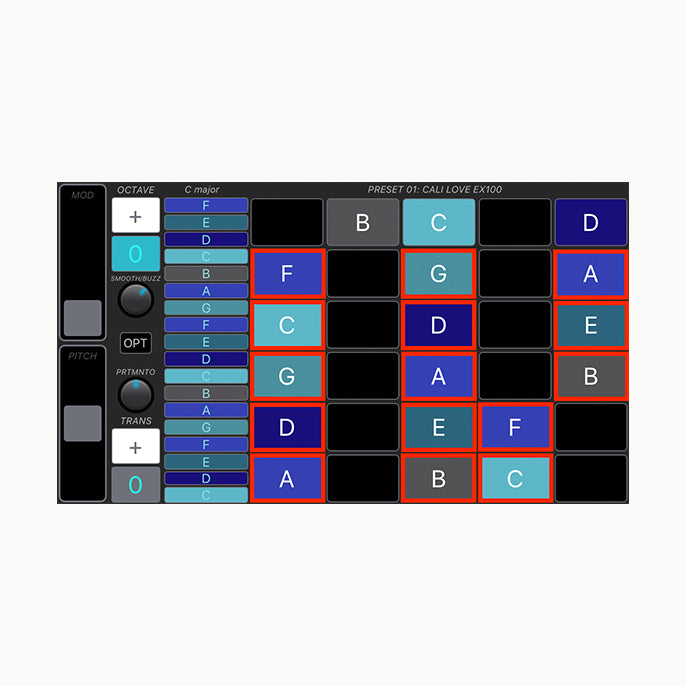
Now, without changing the note sequence, play a minor scale by starting on the first note (cell A).
A Minor Gridbr>
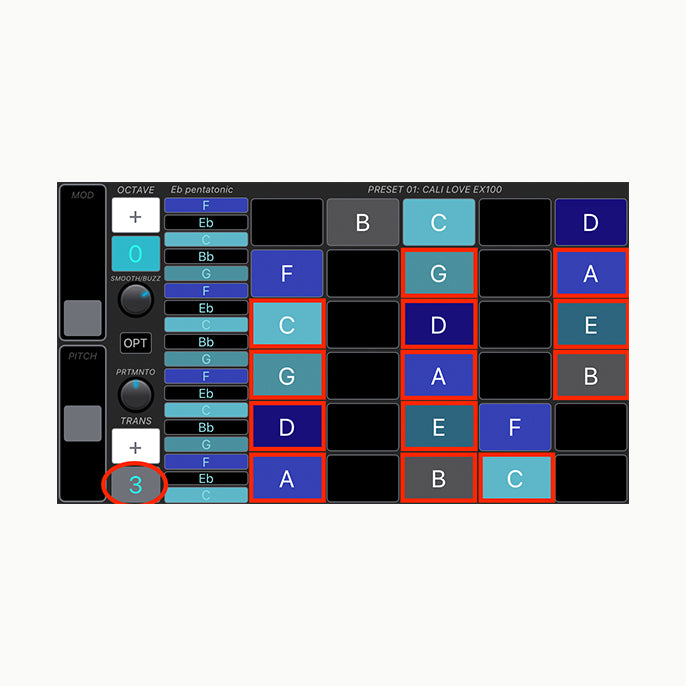
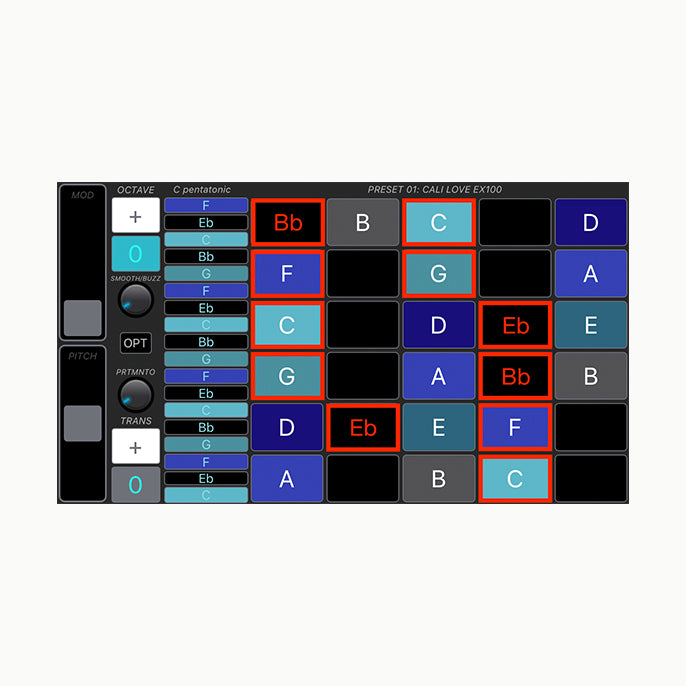
Understanding the Talkbox Synth App’s approach is important. Much like with any musical instrument, good fingering is essential to create ease and playability. This is where the transpose button becomes a great tool! For example to play a C pentatonic scale with optimum fingering, change the transpose value to +3. Since the labeling of the notes is static and won’t change even when the transpose feature is modified, this emphasizes the importance of fingering patterns, and not the labeling of the notes within the scale. This is one of the key methodologies of the Talkbox Synth App playing grid: learning and memorizing patterns and using your ears!
Playing pentatonic on the grid
Below is the non-transposed version. Notice how the finger is different, more spread out, and awkward to play.
Playing the grid non-transposed
California Love is one of the most iconic talkbox songs of all time which was performed by the great Roger Troutman. The song is in the key of G minor. For ease of playing a transposition degree of +10 will enable a Bb scale which is the relative major scale. Again, this where transposition will provide easy fingering but in the right key.
Watch Bosko plays California Love!
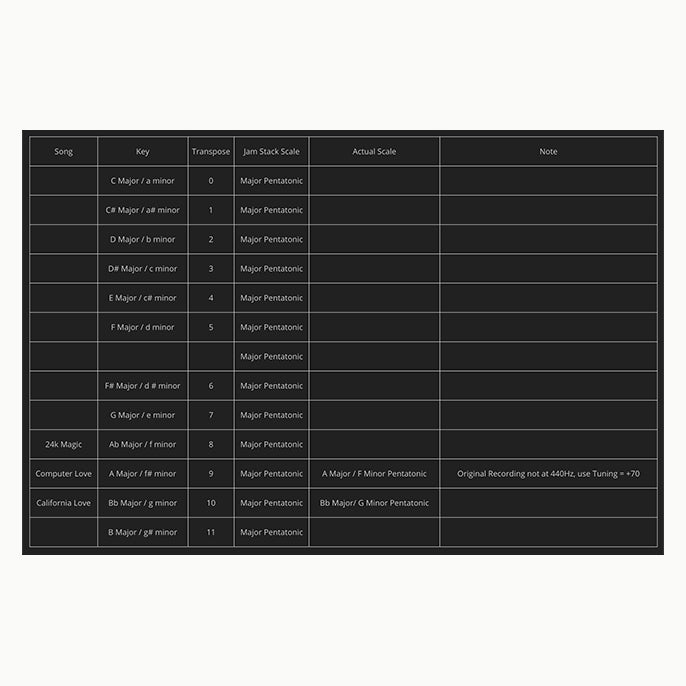
Transposition Table
Song Key Transpose Jam Stack Scale Actual Scale Note
C Major / a minor 0 Major Pentatonic
C# Major / a# minor 1 Major Pentatonic
D Major / b minor 2 Major Pentatonic
D# Major / c minor 3 Major Pentatonic
E Major / c# minor 4 Major Pentatonic
F Major / d minor 5 Major Pentatonic
Major Pentatonic
F# Major / d # minor 6 Major Pentatonic
G Major / e minor 7 Major Pentatonic
24k Magic Ab Major / f minor 8 Major Pentatonic
Computer Love A Major / f# minor 9 Major Pentatonic A Major / F Minor Pentatonic Original Recording not at 440Hz, use Tuning = +70
California Love Bb Major / g minor 10 Major Pentatonic Bb Major/ G Minor Pentatonic
B Major / g# minor 11 Major Pentatonic
Options Window
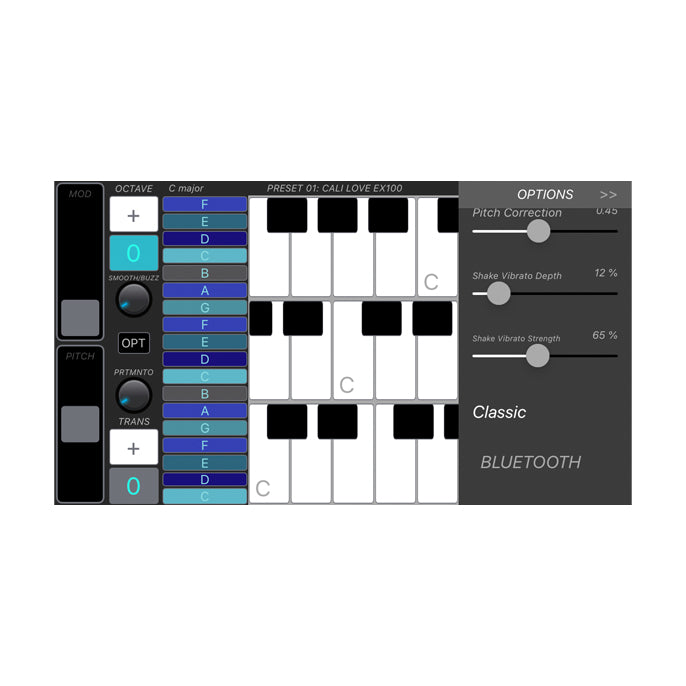
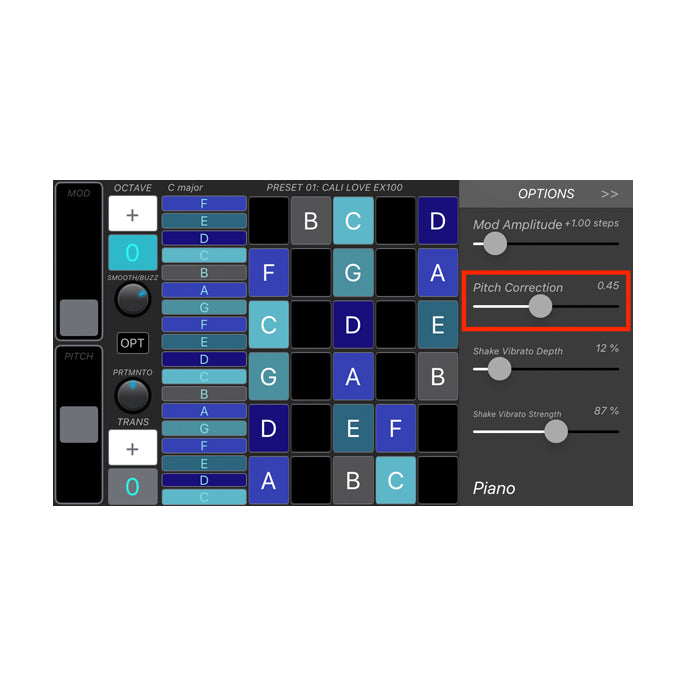
There are several additional features within the options window. You can change the playing grid to a classic keyboard layout. Open the options window and press Piano.
Piano option button
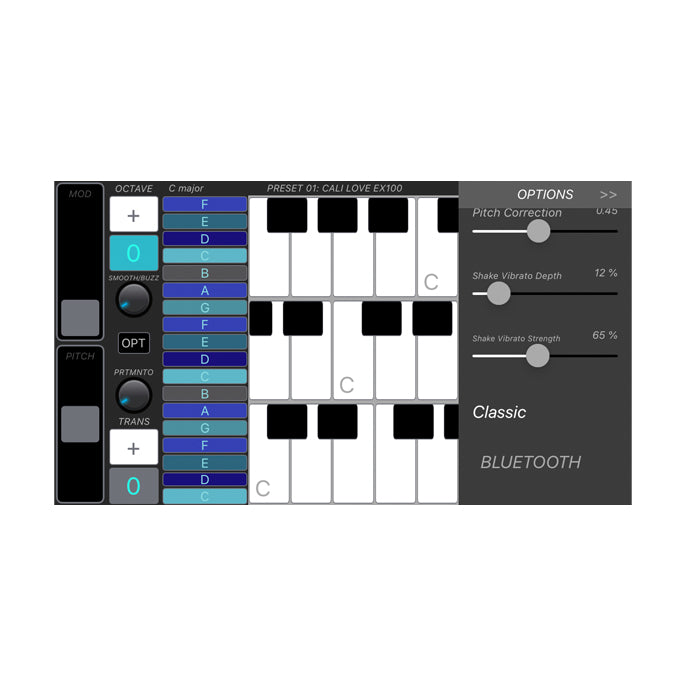
The playing grid will switch to a keyboard layout called Classic.
Piano option button
Close the options window to expand the view. The classic layout shares the same unctionality as the grid enabling you to play fingered vibrato on any of the keys.
Pitch correction
Since the Talkbox Synth App implements fluid control of pitch bend on each note there can be instances where you’ll want to customize this feature. Pitch correction, located in the Options window, allows you to increase or decrease the interpolation of pitch from each note. The higher the value of pitch correction the faster the note will “snap” into place, eliminating the chance of playing a note slightly out of tune. The difference is subtle, but if you find yourself struggling with certain melodies sounding out of tune, try increasing the pitch correction. Or inversely, if you feel like the pitch is too rigid and more interpolation is needed then decrease the value. By default it’s set to 45%.
Tuning
The Tuning option is simply a master tune feature. It allows for overall adjustment of pitch up or down by 100 cents, or often referred to as a half step or semitone. This can be helpful when playing along with sources that are not tuned to perfectly to A=440.
Bluetooth
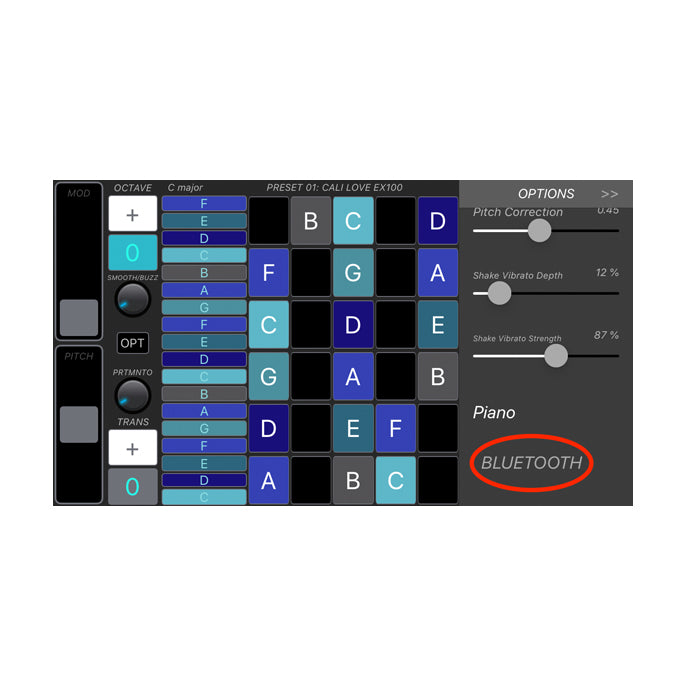
The Talkbox Synth App will work with many MIDI controllers that have bluetooth connectivity. This allows for wireless control of the app’s keyboard. The Korg Microkey is a solid choice and one of Bosko’s favorite! To pair with a bluetooth MIDI controller open the Options window and press Bluetooth.
Bluetooth button
If it’s not appearing try turning bluetooth off/on in your device’s settings menu. For further support go to Apple’s Bluetooth Support page or consult the manual of your bluetooth capable MIDI controller.
Note: The mobile device’s audio still needs to be connected to the ESX-1 via a 3.5mm audio cable to function properly. There is no wireless audio functionality available at this time for the ESX-1.

Connecting a sound source
The ESX-1 must be connected to a sound source in order to function properly. The source can range from an IOS device running the Talkbox Synth App, to a keyboard, computer, or guitar. This section will cover a range of topics such as what cables and adapters to use, the ESX-1 signal flow and how it can work with your sound source.
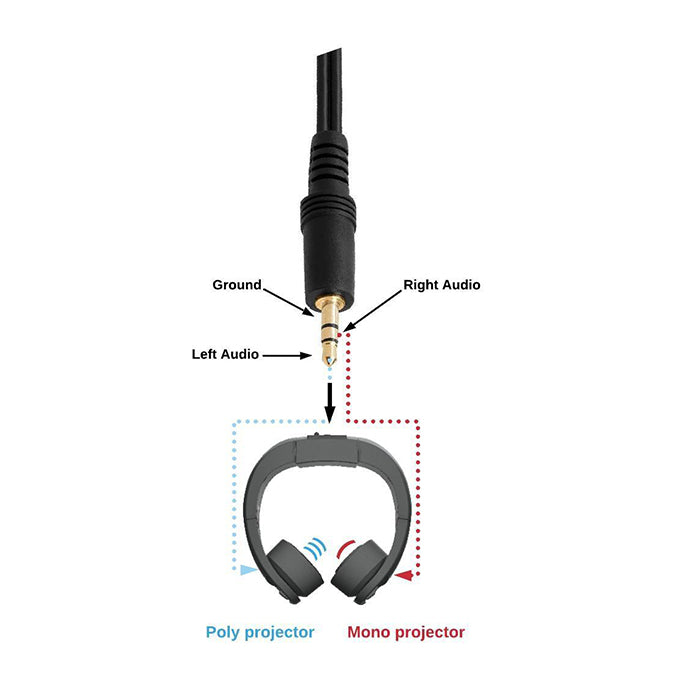
The ESX-1 has two projectors (speakers) which are designed specifically to achieve exciting, expressive talkboxing without using a tube! Located on the right side, the mono projector has a bright, crisp sound and very little low frequency. This is the most important ESX-1 component for making vocal sounds present and intelligible. It's only compatible with mono sounds. On the left is the poly projector, which has a larger pitch range and more low frequency response compared to its counterpart. The additional bass helps create a full, rich sound. The poly projector is compatible with polyphonic sounds and we’ll discuss further how to implement this in the following sections. Just like any stereo speaker or headphone configuration, the ESX-1 needs two signals: one for the left and one for the right. When using the Talkbox Synth App the smooth/buzz control is used to pan from one side to the other. Smooth is routed to the poly projector while buzz is routed to the mono projector. The sum of the two is that unique ESX-1 sound!
Using Compatible Cable Adapters
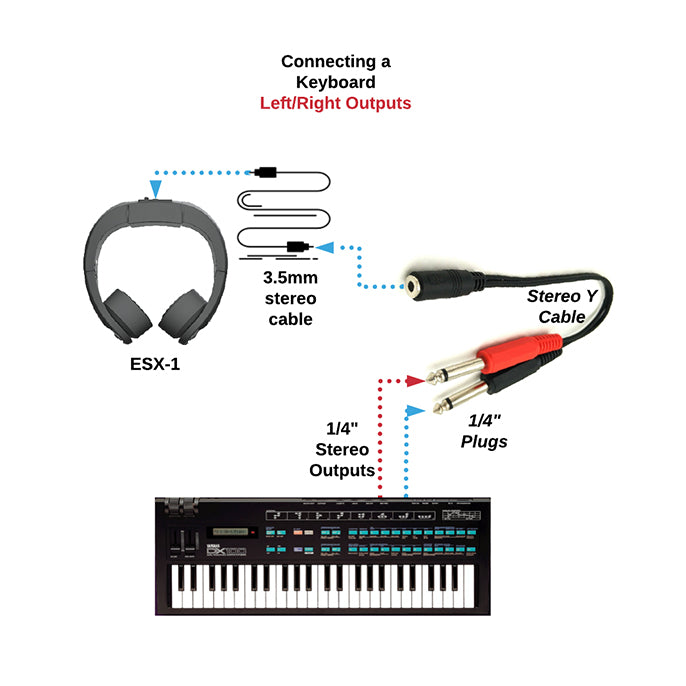
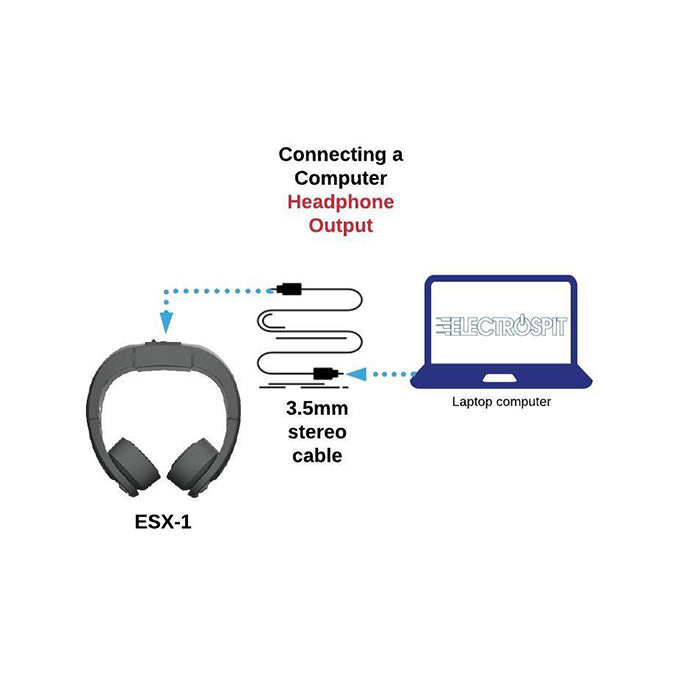
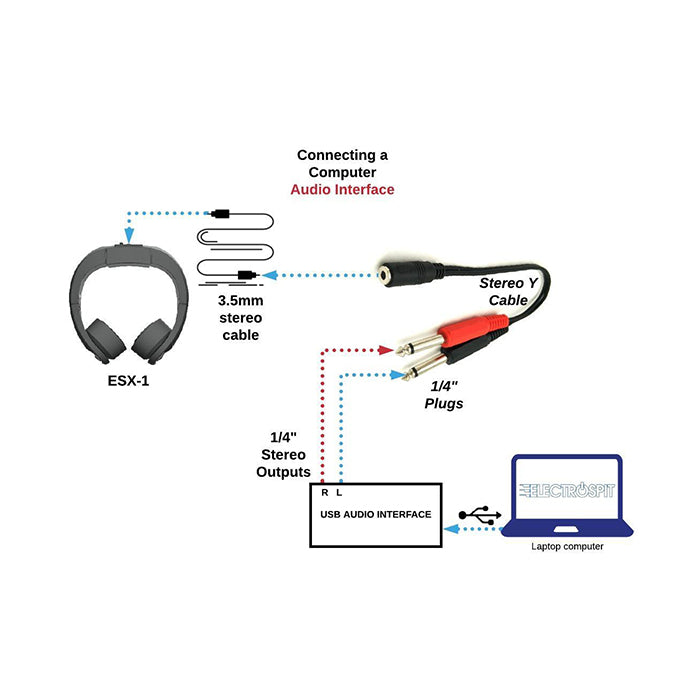
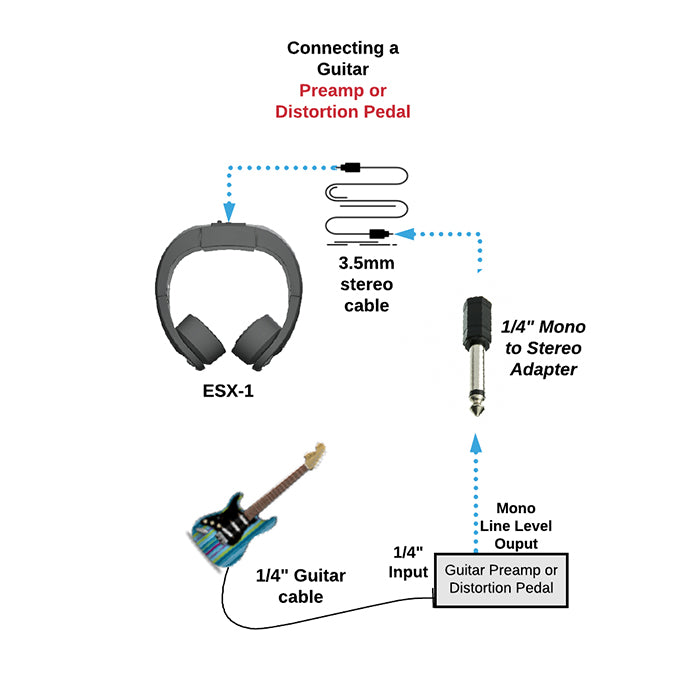
One of the most critical aspects of connecting the ESX-1 to a sound source is using the correct cable and adapters to ensure a proper audio signal path and a secure connection that won’t damage the ESX-1. Below are the most common output jacks found in electronic instruments such as keyboards, electric guitars and computer audio interfaces. Adapters for ESX-1 compatibility are listed.
Mono instrument Output: Requires a 1/4 mono to stereo adapter for ESX-1 compatibility. This essentially takes a mono signal and duplicates it distributing the sound to both projectors.
Headphone Instrument Output: Requires a 3.5mm stereo to ¼ stereo adapter for ESX-1 compatibility. Since keyboard headphone jacks are 1/4" stereo, the adapter converts the plug size to 3.5mm but otherwise the signal flow is otherwise unchanged.
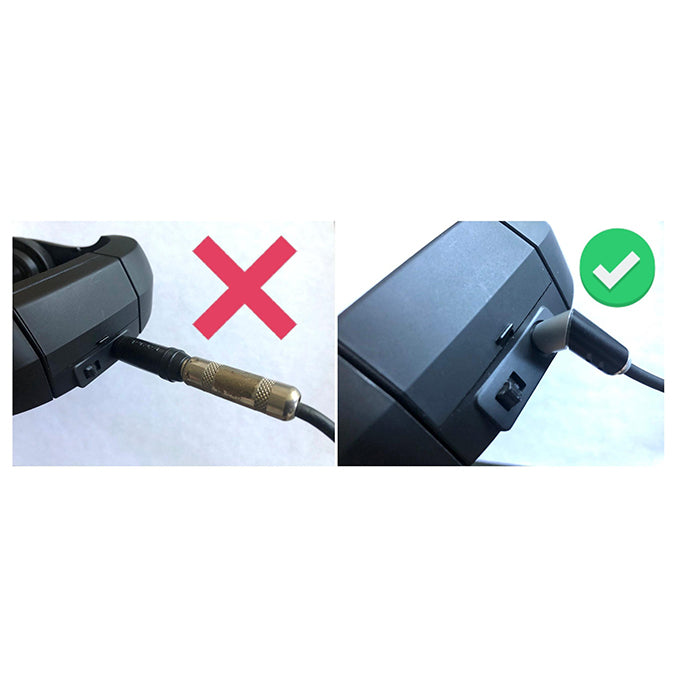
1/4" Left/Right Instrument Outputs: Requires a female 3.5 mm stereo to ¼ left and right Y cable. Why use the small 3.5mm stereo cable and all these annoying adapters? Why not just a guitar cable? It’s essential to use a lightweight 3.5mm stereo cable and not a heavy duty audio cable. Because the ESX-1 is being worn on the body it involves a lot of movement and potential strain on the ESX-1 audio input jack. A right angle plug is essential for helping with strain relief as well.
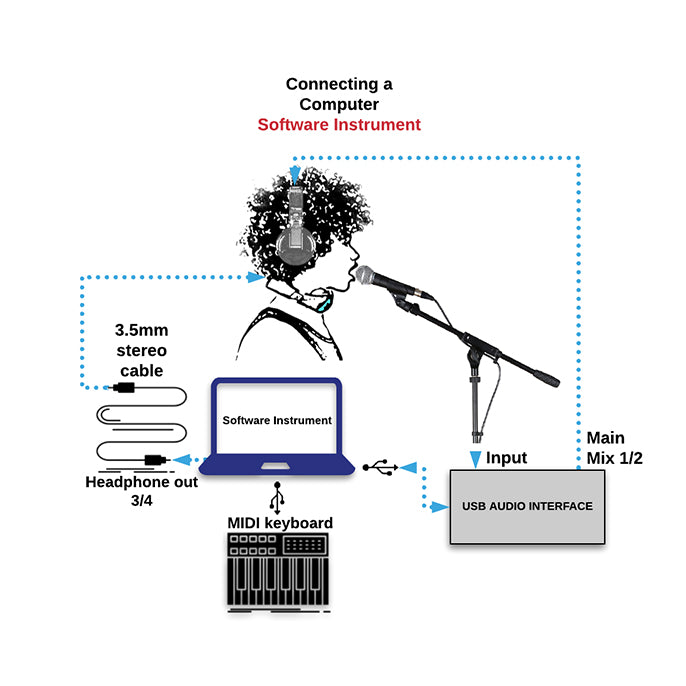
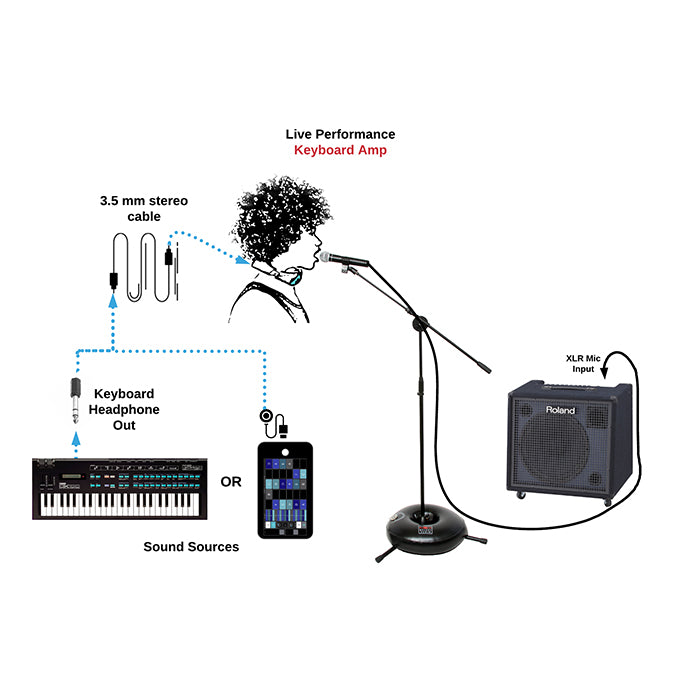
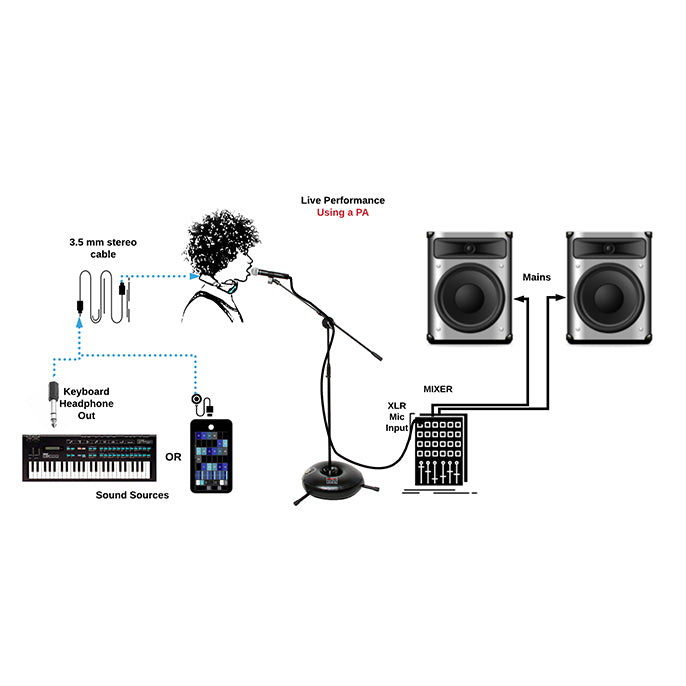
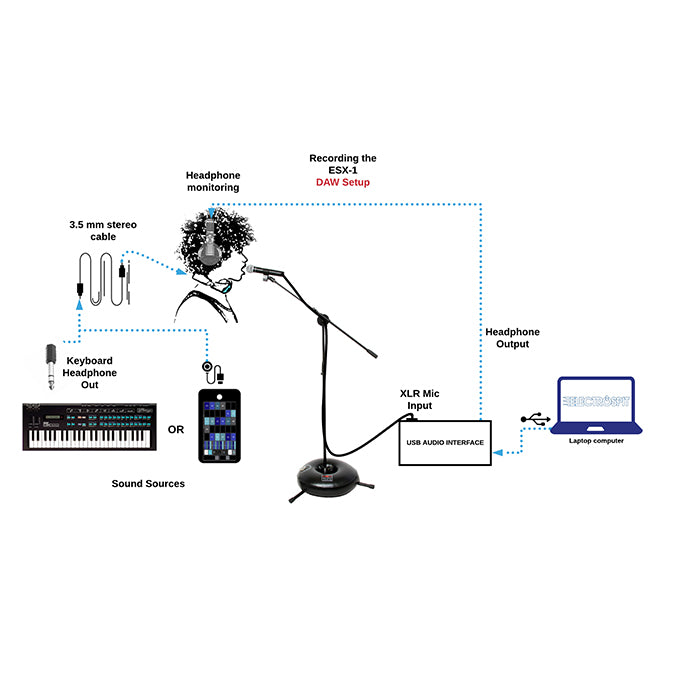
How To Record
Using a Microphone
Any dynamic mic will work with the ESX-1. The Shure SM58 or Telefunken M80 are favorites for capturing the sonic character flexibility. Make sure you’re directly in front of the mic touching the grill with your lips. The closer you are the more powerful the sound.
If the mic is too high or low, it will tilt the neck too much, which in turn, tends to break the seal of the projectors to the neck allowing sound to leak out. This will diminish the quality of the sound.
It’s important to listen to your body as well as the sound. Make sure you’re always comfortable to avoid straining and potential injury and take frequent breaks if you sense bodily strain.
Headphones
Using headphones to monitor your performance will give you a clear sense of how microphone technique impacts the sound you produce with the ESX-1. It's like putting a magnifying glass on the sound and is great for understanding the nuances of the talkbox sound and technique.
Getting the Best Tone
Since the sound of the ESX-1 projectors are sending sound through your neck, up your throat, and out your mouth there are certain physical postures in the mouth and throat that will help optimize your ESX-1 sound.
How To Create A Great Sound
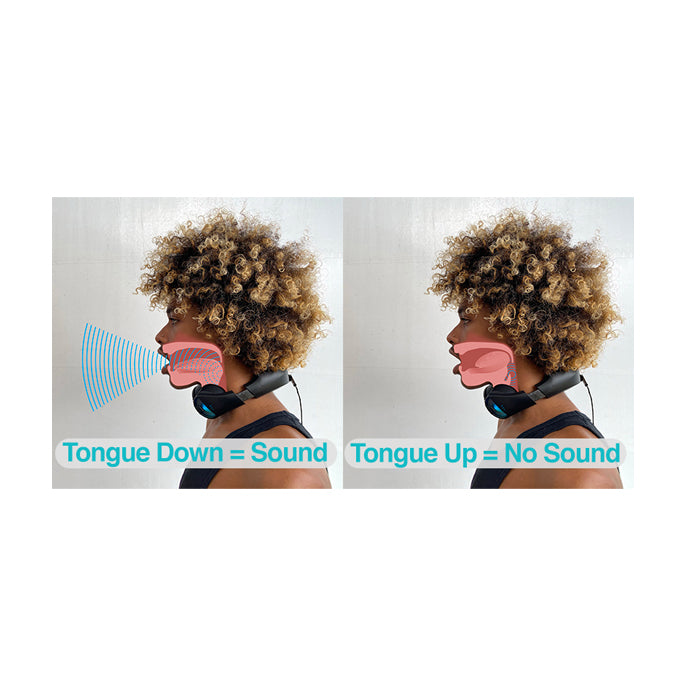
Drop the Adams Apple and Tongue
The purpose of this posturing is to simply let the sound pass through the neck out of the mouth. The throat and tongue can block the passage of sound. So the “dropping” technique is simply to allow an adequate opening. The ESX-1 sound being muffled or quiet is usually a sign that the airway is partially blocked and should be opened more.
Don’t Talk and Mouth the Words (like a Mime)
Oddly, saying a word without speaking it can be quite challenging! It’s true that when using the ESX-1 (and talkboxing in general) there are no actual words being created by the performer, but rather the words come from the ESX-1 and the sound source. As a talkboxer, you are in essence, replacing the vocal cords and air used to make words, with the sound from the ESX-1. And, as discussed earlier, it’s the shaping of your mouth that creates words from that sound source. That’s the unmistakable talkbox sound.
Breathing
Generally, taking a breath and then exhaling before you begin talkboxing with the ESX-1 will help avoid the tendency to speak or sing the words. It also closes off the airway allowing sound to travel in only one direction - out of the mouth!
This can be a challenge at first but is an important technique to learn. Much like a horn player, the timing of taking a breath is something that needs practice, and is part of the craft to be mastered. Just ask Mr. Talkbox!
Making Words
Consonants
Practice saying words more percussively, especially if they begin with a consonant. It's a lot like beatboxing. Give them a really sharp and attack and you'll find the word becomes more defined.
Vowels
A, E, I O, U are good to repeat when practicing and warming up. There is a range of movement in the mouth that manipulates the character of the vowel. For example, experiment with saying the vowel O shaping the mouth in different ways. Notice how the same vowel sound will change slightly depending on the size of the mouth opening, lip position and tongue position.
Counting
Counting is a great way to practice too. Count from 1-10 and then back down again. Repeat several times while taking note of how each number sounds as you make adjustments.
Playing the App
Learn about important expressive features like grace notes, portamento, glide time, and pitch bend
Recording and Mixing Talkbox
This is an incredibly vast subject and getting into detailed instruction is outside the scope of this document. However, here are a few tips that can help quickly elevate your talkbox production.
Treat it Like a Vocal
If you’ve recorded or mixed vocals before you’ll notice that capturing an ESX-1 performance is similar. Follow the guidelines in section 9, and if you have a trusted vocal chain for dynamic processing and EQ use that when tracking the ESX-1. A high frequency EQ shelf or bell curve can help improve clarity of the words. Try 3k-5k as a starting place and work from there.
Effects
Like any vocal track, reverb or chorus can be a way to add depth and dimension.
Harmonies
When stacking/overdubbing parts it’s good to pan each one so as to create space for each part. This also allows a main part in the center to stand out whether it's ESX-1 or a main vocal.
